

Saturday, October 25, 2014
Fall Coronation Invite
I was asked to do a nice invitation for Ansteorra's fall coronation. It took me a few days to get it finished and turned out rather nicely.
Thursday, October 23, 2014
Back to Verdigris
Last time I was at the store, I remembered that I needed some cheese cloth for when I get back to my verdigris experiments. So, getting the homemade wines I had been given late last year into jars and put up to vinegar has been on my mind. The other day while in the middle of waiting for the baking I was doing to finish, I pulled out the wines, jars, and cheese cloth to get the vinegar making started hopefully.
What I've found on making vinegar from wine has been really simple, expose the wine to air and let it sit. In clear jars you want dark ares as the light apparently harms the bacteria you want to grow.
So, we'll see how things turn out in a few months or so.
 |
| The two wines in jars in a small unused cabinet |
Wednesday, September 24, 2014
Owen's Chivalric Quest Book: Part IV
Covering the boards with the white leather went pretty well. The wheat paste didn't attach well to the ends of the perg paper, so I'll need to look into other glues and see what will work better. But, even for that, the book seems nice and sturdy.
 |
| Pasting the outside down. |
 |
| Pasting the turn-ins. |
 |
| Getting ready to paste down the end papers. |
 |
| Finished book. |
Owen's Chivalric Quest Book: Part III
The book board were another challenge. My first attempt I only dug channels in the inside for the supports to go; this time I drilled and chiseled out channels going through the boards to lace the supports through the boards.
It was touch to get the draw knife started when trimming the pages. I see why the draw knife was eventually dropped for a book binders plow.
 |
| Channels cut through the book boards. |
 |
| Supports laced to the book boards and attached. |
 |
| Pages trimmed to the boards. |
 |
| End bands sewn in |
Monday, September 22, 2014
Owen's Chivalric Quest Book: Part II
The binding process made me nerviness. We had spent so many hours working on all of those sheets and now I had to punch holes in them and cut them to shape eventually. While I did the binding, Nic work on the brass clasps.
Punching holes in the gatherings was the point I was at my most nerviness. After that, it was a lot easier to do what I had to, to turn the gatherings into a book.
I did manage to stab the tips of a few fingers while doing the sewing, drawing only a little blood each time, so bleeding on this project was kept to a real minimum.
Punching holes in the gatherings was the point I was at my most nerviness. After that, it was a lot easier to do what I had to, to turn the gatherings into a book.
 |
| Punching holes in the gatherings. |
 |
| Sewing frame all set up. |
 |
| Sewing the first gathering on. |
 |
| All finished. |
Thursday, September 18, 2014
Owen's Chivalric Quest Book: Part I
Owen's Chivalric Quest Book has been completed and presented, so I'll be getting into it's creation and process.
You can find a documentation write up, here.
Once all the calligraphy was finished, we started drawing the illumination part of the project. We did a page with miniatures at the start of each section, and every page of calligraphy received at least a boarder. In total there are 170 pages that were drawn on and painted.
We mixed our own paints, besides for the gold. It would have saved some time and fussiness if we had gone with store bought paint for all of our colors. We went through two to three batches of paint for the major colors.
We painted the base colors on each page. If I had the space I would paint one side of every sheet in a gathering at a time. By the end of the project, we had figured out how to assembly line the illumination.
Drawing the black lines around the painted areas made it look really dark. We ended up having to remind ourselves many times that the white work would make it look better.
Adding the white work brought everything together. This the the stage we started getting excited about how things were turning out.
You can find a documentation write up, here.
Once all the calligraphy was finished, we started drawing the illumination part of the project. We did a page with miniatures at the start of each section, and every page of calligraphy received at least a boarder. In total there are 170 pages that were drawn on and painted.
 |
| Adding Drawings. |
 |
| Nic mixing pigments to paint. |
We painted the base colors on each page. If I had the space I would paint one side of every sheet in a gathering at a time. By the end of the project, we had figured out how to assembly line the illumination.
 |
| base painted areas |
Drawing the black lines around the painted areas made it look really dark. We ended up having to remind ourselves many times that the white work would make it look better.
 |
| outlined in black |
 |
| Finished sheet. |
Tuesday, July 22, 2014
Bookbinding - Attempt One: Turn Ins
After what seemed like a long time, I pulled the book out from between the board and readied to paste down the leather that turns around edge of the book to the inside. Figuring out the cuts to a little bit as all the examples I found was for modern book board, not oak boards. Eventually, I had things trimmed and ready for the pasting. I did wrap the paper pages in wax paper so they wouldn't get glued together.
 |
| Almost ready for pasting. Just need to add a protective cover to the paper pages. |
 |
| Paste down completed, a quick picture before the book gets clamped again. |
 |
| All clamped up, time to let dry again. |
Thursday, July 17, 2014
Bookbinding - Attempt One: End bands & Leather Cover
The end bands went really quickly. I expected to start them at home and finish up during a local meeting. Well I finished them before I needed to even start rounding up the family to leave for the meeting.
I didn't get many pictures of covering the outside with leather as I could have used a third hand in doing this part. I'm sure like with everything a little practice goes a long way.
I didn't get many pictures of covering the outside with leather as I could have used a third hand in doing this part. I'm sure like with everything a little practice goes a long way.
 |
| A finished end band. The extra will be cut off later. |
 |
| Leather pasted to the outside of the book. |
 |
| Slightly different view of the drying pressed book. |
Tuesday, July 15, 2014
Bookbinding - Attempt One: Trimming and Spine
None of the local big box home improvement stores carry a draw knife, so when it came to trimming the paper to the boards, I ended up using a craft knife and then filing it to flush with the boards.
Afterwards I used some wheat paste and bookbinding super cloth to reenforce the spine of the book. I pasted the cloth over the outside of the boards as per one of the examples in J.A. Szirmai's book, The Archaeology of Medieval Bookbinding.
The end bands will be done after the spine has dried.
Afterwards I used some wheat paste and bookbinding super cloth to reenforce the spine of the book. I pasted the cloth over the outside of the boards as per one of the examples in J.A. Szirmai's book, The Archaeology of Medieval Bookbinding.
The end bands will be done after the spine has dried.
 |
| Pages trimmed to the book. |
 |
| Pasting down the cloth to reenforce the spine. |
Thursday, July 10, 2014
Bookbinding - Attempt One: Attaching the boards
When it came time to attach the supports to the boards, I used small upholstery nails found at a local sewing shop.
 |
| Nailing the supports to the boards. |
 |
| All done with one side. |
 |
| Boards attached, time to trim. |
Tuesday, July 8, 2014
Bookbinding - Attempt One: The Boards
I prepared the oak boards using almost all hand tools. I did use a powered drill to drill the holes for the end bands. So far so good.
 |
| Using a rasp and files to shape the edges of the boards. |
 |
| Areas for the supports ready for chisel work. |
 |
| Areas chiseled out ready for the supports. |
Thursday, July 3, 2014
Bookbinding - Attempt One (Cont)
I don't think I started off my stitching tight enough, the first gathering is a bit loose, compared to the others, but the stitching went really quickly once everything was set up. Next I'll need to cut the boards and do some work with the chisels to make the channels.
 |
| All the gatherings stitched to the leather supports. |
 |
| Another view, before taking the book off the frame. |
 |
| Ready for the next step. |
Tuesday, July 1, 2014
Bookbinding - Attempt One
I was able to give my new sewing frame a test run. Materials include, paper from a sketch book, linen thread, leather strips, split (Might be to short, guess I'll find out). Over all the frame was a bit of an issue to get all set up by myself this first attempt. I might have to make a pair of shorter uprights for the frame at some point. So far it's been fun putting to use things I have only read about to this point.
 |
| Folding the paper. |
 |
| Punching holes for thread |
 |
| Setting up the sewing frame. |
 |
| Starting the stitching. |
Sunday, June 29, 2014
Collapsible Sewing Frame for Bookbinding
This past Saturday, I was able to spend some time on a project I've been thinking about making for awhile now, a collapsible sewing frame for bookbinding.
It's made out of red oak, using modern power tools, and finished using danish oil.
It's made out of red oak, using modern power tools, and finished using danish oil.
 |
| All taken apart. |
 |
| Assembled. |
 |
| Assembled, another view. |
Thursday, June 26, 2014
De Clarea Wooden Whisk
The other evening I attempted to make a few wooden whisks based on Thompson's translation of the De Clarea manuscript fragment. I used apple branches cut that day for my flexible wood, and their was three that bent without breaking. I did tie the bent end down while the wood dried. After letting them sit for a few days, I untied the wood and two of the whisks look to be useable, while the third splintered a bit around the curve. I might be able to trim it up some.
I've also picked up a sea sponge and working on getting a scrap piece of wool cloth. Once I get the cloth, I'm planning on making glair using the various tools and compare the results myself. The Author of De Clarea says glair made using the whisk is the best while the pressed (wool cloth or sponge) is brittle and not good. Should make for an interesting afternoon or evening.
 |
| One bent wooden whisk |
 | ||
| Copy of the drawing from De Clarea (about middle right side of the paper) |
Tuesday, May 27, 2014
Something new: Waxed Tablets
I've been doing a lot of calligraphy on Owen's project lately. I've also been picking up the tools I'll need to eventually bind all that calligraphy into a book. I spent the afternoon using the new tools to make a waxed tablet.
 |
| Carving out the bed for the wax. |
 |
| Close up. |
 |
| Uncolored beeswax for the stain, and beeswax colored with carbon black for the writing surface. |
 | ||
| Leather lace ties. Stylus by Randy Asplund. |
Monday, April 21, 2014
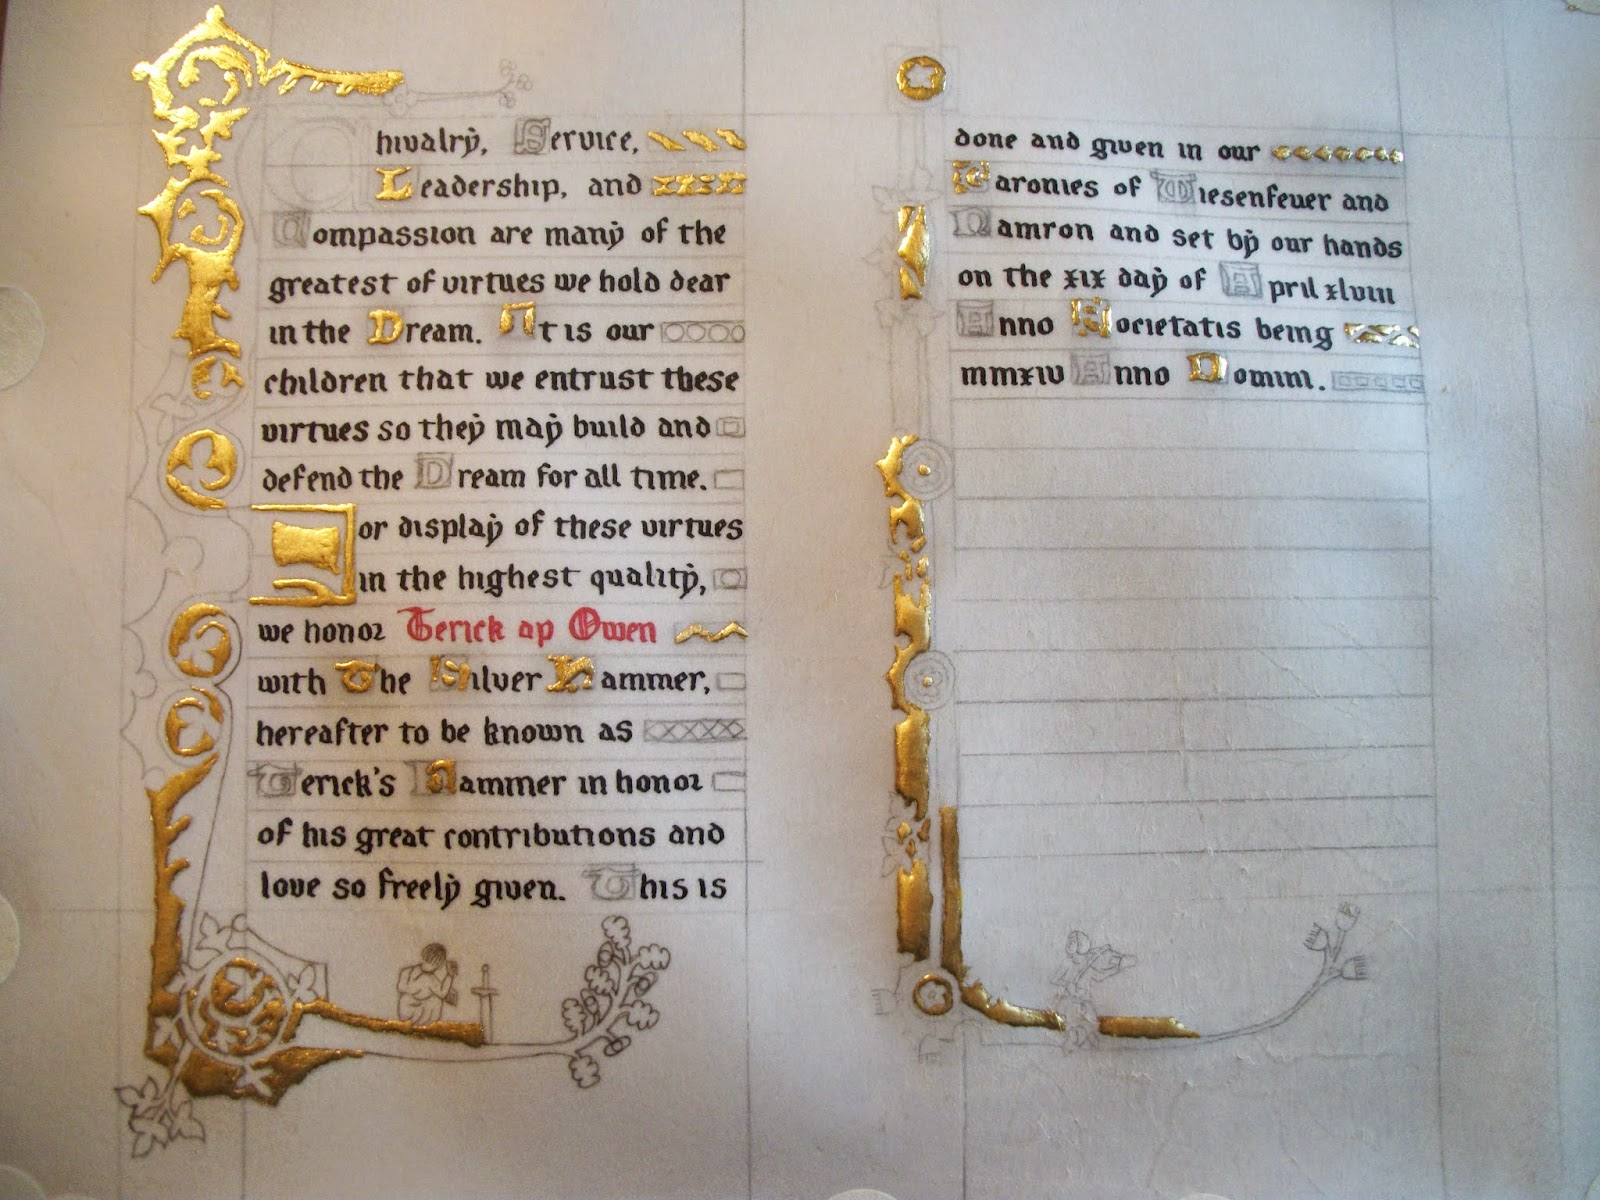
Terick's Hammer
I was asked to produce an award certificate to honor a teen. A fire happened at his home and he perished in it. The young man was special to the various SCA groups in the Oklahoma area, so after some brainstorming, an extra special award certificate was requested. The follow pictures document the process of creating Terick's Scroll. The Scroll was given out at Wiesenfeuer Baronial 2014. The size is 10 in x 13 in and from start to finish, time spent working was spread over 4 days. Materials include parchment, 23kt gold leaf, ink and paints created with period recipes.
 |
|
Practice calligraphy
|
 |
|
Inked Illumination layout
|
 |
|
Layout and drawing completed using a lead-tin stylus.
|
 |
|
Calligraphy finished. Used a carbon ink for the black
text and real vermilion for the red text.
|
 |
|
Minor Initials and boxes for line fillers added
|
 |
|
23kt gold leaf being added
|
 |
|
Gold leafing finished.
|
 |
|
While modern tests have reviled that
azurite was used instead of ultramarine on the Macclesfield Psalter, I used
ultramarine pigment for my blue as I don't have any azurite currently.
|
 |
| Red Lead paint being added. |
 |
|
Added the second red, instead of a
plant based pigment that would fade with time being exposed, I used vermilion.
|
 |
|
Last of the base colors added. A green
and lead white on the figures clothes.
|
 |
|
Details added to the figures and
black lines started to be painted.
|
 |
|
Detail image of one of the figures.
|
 |
|
Black lines finished on both pages.
|
 |
|
White work done with lead white.
Finished picture - no flash.
|
 |
|
Finished with flash on.
|
Subscribe to:
Posts (Atom)